 | Check-Six.com | |
Offering Aviation History & Adventure First-Hand! | ||
| ||||||||||
|
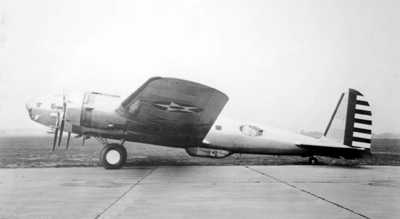
The Crash of the B-17C near Tells Peak, CA | ||||||||||||||||||||||||
On October 31st, 1941, a B-17C, Tail No. 40-2047, also know as the "Flying Fortress," started a routine flight for a change of their No. 3 engine from Salt Lake City, Utah, to Sacramento, CA. After a two day stopover in Reno due to bad weather to the west, they departed late on the morning of November 2, 1941 (based on the weather observations of a United Airlines pilot flying in the area) on an instrument flight to their destination. |
| |||||||
There was no Command Set (Click here to learn what is a "Command Set"") installed on this aircraft during this flight, so the flight crew relied on their Compass Set radio to navigate to the airfield in Sacramento. After passing Lake Tahoe, the plane entered into the overcast sky. Then, after several minutes, the radio begun to static, and communications were down to the point where they were unable to check it at Donner Summit. Attributing the loss of radio functions to a temporary static condition, the pilot, 1st Lieutenant Leo M. H. Walker, continued on the Sacramento via a more southerly route (based on the weather report of the United pilot). Then, at that moment, the No.1 supercharger began to have problems maintaining pressure. With the vehicle in a climb towards 14,000 feet, the co-pilot, 2nd Lieutenant John R. Mode, attempted to manipulate the supercharger controls to add additional pressure to it. Being partially successfully (the pressure continued to change, but not be lost entirely), the flight continued onward. Then, after 45 minutes of flight, the flight indicators all ceased working. With the vacuum pumps having problems (but still working), and the pitot tube heat being turned on, no clear cause could be determined for this difficulty. So the pilot and co-pilot decided to head back to Reno. Throttling up the engine RPM to climb to 18,000 feet, the aircraft pulled to right. The flight crew, trying to hold the B-17 in a straight line of flight, cut the engine power to try again. After a more successfully attempt, the pilot and co-pilot realized they were having serious troubles controlling the airplane the pilot ordered the crew to don parachutes as a precaution, and be ready to bail out of the ailing aircraft. With their bank-and-turn instrument being the only functioning guide, the aircraft seemed to be handling fine. Then, the nose rose slightly, the pilot compensated by pushed the controls downward. Lt. Walker, attempting to level off the aircraft's descent, realized that flight controls had been lost. He attempted to pull the controls back to regain attitude, but the aircraft then rolled over onto its back, righted itself for a brief moment, and then plummeted into a spin. | ||||||||
Knowing now that abandoning the aircraft was necessary, the flight crew starting bailing out the airplane. One crewman, Corporal Sterling Isom, with thrown through the glass of a gunner's turret into the air. Another crewman, Private Alden H. Stookey, was ripped out through a big hole in the fuselage. Several other crewmen managed to escape when the tail section of the plane was sheared off by the excessive stresses of the spin. When the flight crew opened their hatch to escape, the flight engineer, Staff Sergeant Eugene M Clemens, was also thrown from the plane and had his jacket blown off of him. Lt. Mode escaped the disaster, and and as he drifted downward witnessed debris from the aircraft falling around him for several minutes. Of the nine-person crew, eight survived. Only the plane's pilot failed to escape. His ordering the crew to wear their parachutes saved their lives. However, his parachute was found draped on a fence post near the crash site. |
| |||||||
| ||||||||
We are currently searching for photos of the crash site taken during the investigation. If you have any - please contact us. | ||||||||
| ||||||||
Shown on the map below are the relative positions of the items we located marked in blue. The terrain is not very rough, however, there are some areas of thick brush. | ||||||||
| ||||||||
|